Wednesday, December 19, 2012

Broiled Grapefruit

I ordered a box of assorted fruit from a local fundraiser and decided to jazz up the grapefruit. Simple and delicious. Trust me?

Ingredients:
  • grapefruit 
  • cinnamon 
Instructions:
1. Preheat your oven's broiler.
2. Slice grapefruit in half and place cut side up on a cookie sheet.
3. Lightly sprinkle with cinnamon.
4. Broil 4-6 minutes, or until top of grapefruit appears caramelized and slightly golden.
5. Enjoy warm.

Heating the grapefruit brings out the natural sugars and softens the grapefruit.  Now it's easier to eat and sweeter!

Tuesday, November 27, 2012

Turkey Veggie Tray

I put this cute little guy together for a family thanksgiving celebration.  Since it needed to be large enough for about 40 people, I made some alterations and piled the veggies pretty high. This could really be done with any variety of vegetables and and size. The face of the turkey is the butt-end of the green pepper.  Using toothpicks, I pierced chocolate covered raisins (it's just what I had on hand, anything small and black will work) and small pieces of peppers to make the face. Have fun with it.

Monday, November 5, 2012

Baked Butternut Squash

A fabulous harvest-season side dish to complement nearly any meal. Ask around, people who grew squash this year are likely looking to share.
Lightly seasoned so you can enjoy the true taste of fresh squash!

Ingredients:
1 butternut squash 
2 Tbsp. olive oil
1/4 tsp. salt 
1/8 tsp. ground cinnamon 
1/8 tsp. ground nutmeg 
1/8 tsp. black pepper 
6 tsp. brown sugar 

Instructions:
1. Clean surface of squash and cut in half lengthwise.
2. Remove and discard seeds.
3. Brush squash halves with olive oil.
4. In a small bowl, combine the salt, cinnamon, nutmeg and pepper; sprinkle over squash halves.
5. Place 2 teaspoons brown sugar into each half. Sprinkle remaining brown sugar over cut sides of squash.
6.  Place in an 11x7 glass baking dish coated with cooking spray.
7. Cover and bake at 350° for 40 minutes. Uncover; bake 30 minutes longer or until squash is tender.
8. Allow squash to cool for 10-15 minutes (or until cool enough to handle).
9. Scrape squash from outer shell into medium bowl and mash. Serve immediately or refrigerate and heat in microwave before serving.

If the baked squash isn't mashing very easily with a fork, use a hand-held mixer or stand-up mixer if you're awesome and have one. 

Monday, October 22, 2012

Greek Yogurt Fruit and Chia Seed Parfait

My almost daily go-to breakfast. It's quick, it's inexpensive and it's satisfying. Using plain, fat free Greek yogurt reduces the sugar and subsequently, Calories. The addition of chia seeds (and whole fruit) increases the fiber content and nutrient density of this yummy concoction. I use frozen fruit as I think the extra cold fruit pieces taste better and are easier to keep around the house but fresh works too. Prepare a couple at a time for added convenience or to share (aside from being delicious, they're pretty cute)! Packed with protein and fiber, this breakfast treat will easily keep you satiated until lunch.


Ingredients:
1 cup Plain 0% Greek Yogurt
1 tsp. Chia Seeds
1/8 cup fresh or frozen raspberries (no sugar added)
1/8 cup fresh or frozen blueberries (no sugar added)
2 packets artificial sweetener (I use Truvia)

Instructions:
1. In separate bowl, mix yogurt and sweetener.
2. Fill bottom of small glass with a spoonful of sweetened yogurt.
3. Sprinkle small amount of chia seeds and place blueberries around the perimeter of the glass.
4. Place another layer of yogurt on top of blueberries.
5. Sprinkle with chia seeds and add a layer of raspberries around the perimeter of the glass.
6. Continue to repeat layering of chia seeds, fruit, and yogurt until you are out of supplies.

Don't be alarmed when you notice the chia seeds have gelatinized. They're supposed to. That's what contributes to their feel-full effect! 


Tuesday, October 2, 2012

Pumpkin Muffins (and purée how-to)

ok...so not the healthiest, but nothing short of delicious! I used a pie pumpkin and made the pumpkin purée myself (time consuming, but simple). One could opt to omit the cream cheese frosting, but I just couldn't...


Ingredients:
1/2 cup butter, softened
1/4 cup brown sugar
1/4 cup sugar
1 1/2 cups pumpkin puree
1 egg
1/2 cup skim milk
1 teaspoon vanilla
1 cup all-purpose flour
1 cup whole wheat flour
2 teaspoons baking soda
pinch of salt
1 teaspoon cinnamon
1/4 teaspoon nutmeg
1/4 teaspoon ginger
---------------------------------------
Topping:
1 Tbsp. brown sugar
cinnamon and nutmeg to taste

Frosting:
4 oz. cream cheese
1/4 cup butter
2 cups powdered sugar
1 tsp. vanilla extract. 

Instructions:
1. Preheat oven to 375 degrees. Line muffin tin with liners (or spray with nonstick cooking spray if you don't have any).
2. Cream butter and sugars until fluffy.
3. Add pumpkin and egg and beat to combine. Add milk and vanilla and continue to beat until well mixed.
4. Mix dry ingredients in a bowl, and add to sugar mixture. Stir by hand just until combined.
5. Fill muffin tin wells 3/4 full, making sure batter has an appealing flat-ish top, as it won't change while baking. Combine topping ingredients and top each muffin with mixture.
Bake for 22 minutes or until a toothpick inserted in center comes out clean. Remove from pan and let cool on wire cooling rack.

Yields 20 regular sized muffins.

Word to the wise- if you're using a muffin tin with 12 wells, 4 will be empty on the second round. Fill the empty wells with water prior to baking to keep the muffins from baking uneven. Trust me, you'll be happy you did. 

While baking, beat together frosting ingredients and store in refrigerator until muffins are cooled and ready to frost.

Pumpkin Purée
If interested in making the pumpkin purée yourself, simply get your hands on a pie pumpkin and preheat your oven to 350 degrees.
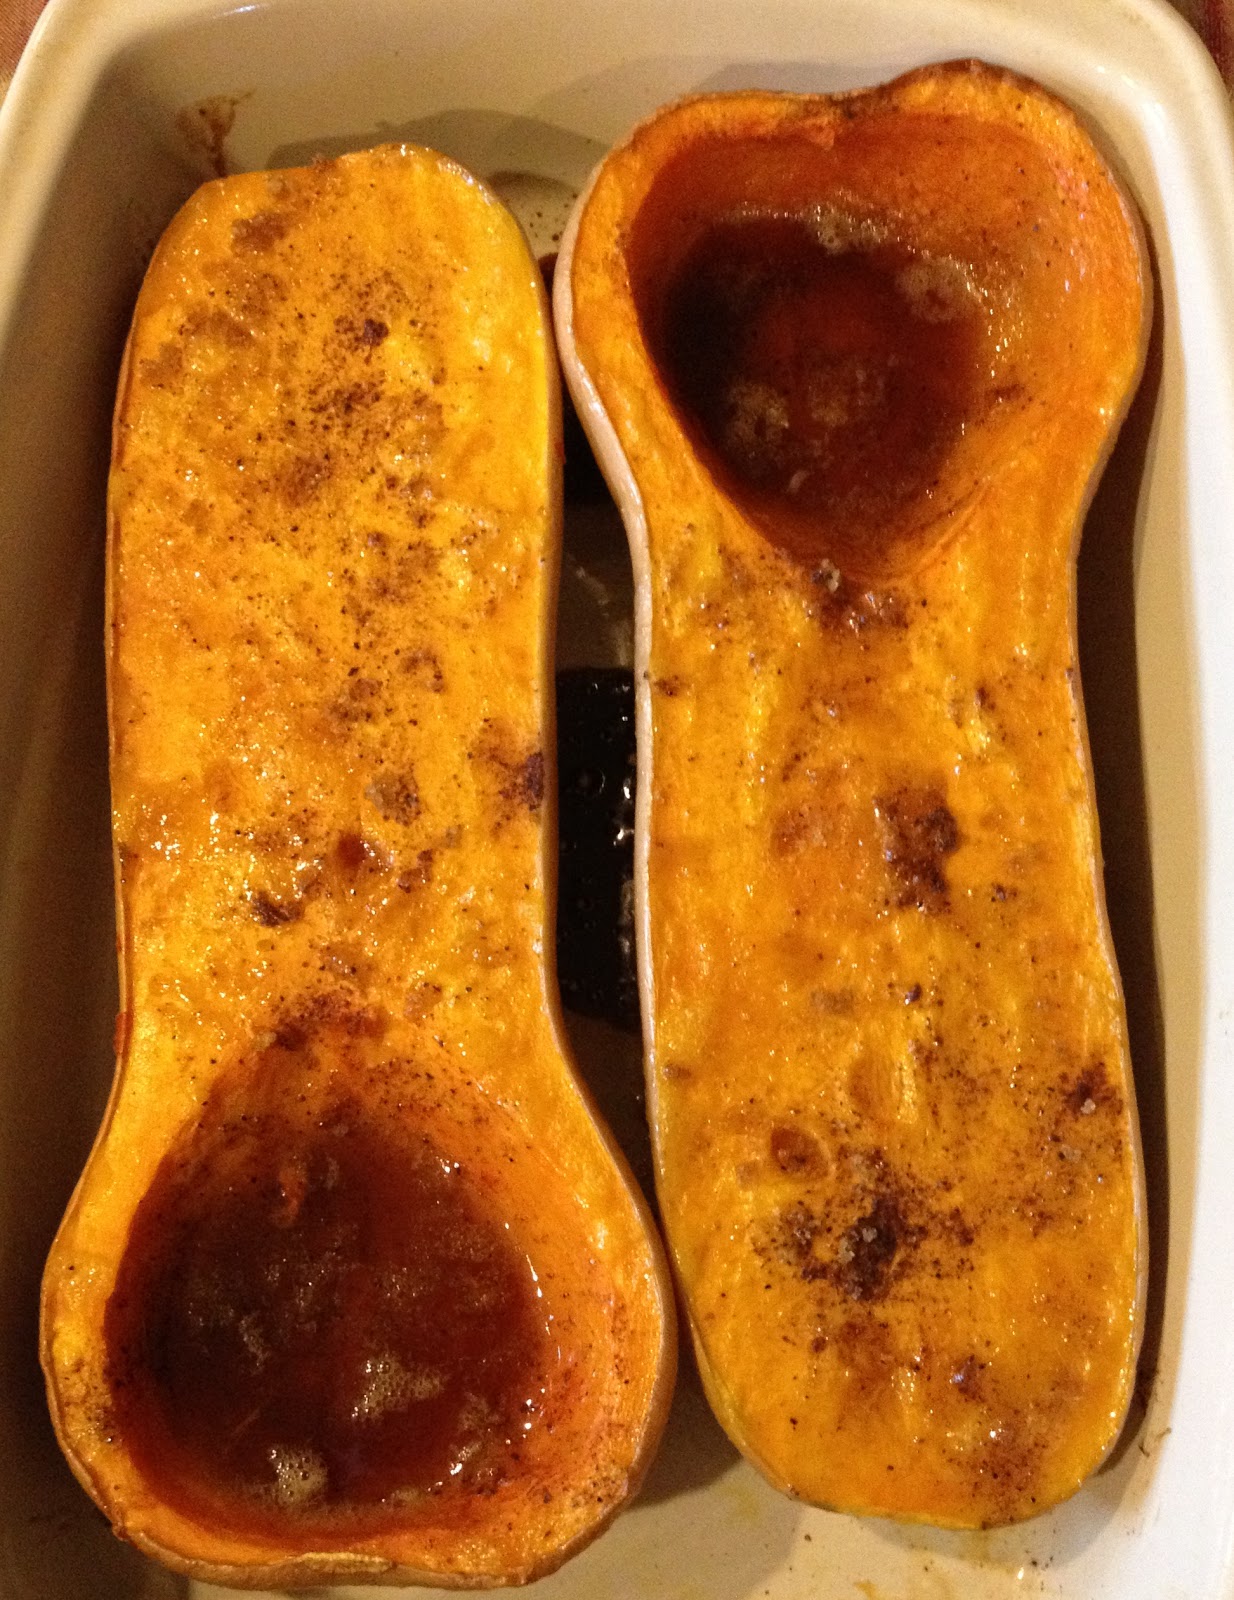
1. Slice the pumpkin in half and remove the seeds and stringy stuff (I baked the seeds for a little snack!).
2. Coat the inner pumpkin with a small amount of olive oil and place cut side down in a baking dish. Add 1 cup water.
3. Bake for 90 minutes. Remove from oven and let cool until cool enough to handle. Gently scrape the pumpkin from the shell and place in a medium bowl. The outer pumpkin shell will practically fall off.
4. Mash pumpkin with a fork and place on a paper towel to remove excess water.

The finished product has a much lighter color than canned pumpkin so don't be weird-ed out when it doesn't look like what you're used to. Stores well frozen in a freezer safe ziploc bag. 

Wednesday, September 26, 2012

Homemade Applesauce

Ok, clearly I love fall...and fall related food items. A naturally sweet and delicious side dish or snack. Depending on the apple variety you're working with, you may need to reduce or increase the sugar. I used about 4 honeycrisp and 6 sweet sixteens. I left the sauce a little chunky, largely because making it homemade allows me to. Turned out fantastic with a lot of natural apple flavor and sweetness coming through. After giving this a whirl, you'll probably wonder why you ever purchased applesauce pre-made.

mmm....


Ingredients:
10 apples (approximately; peeled, cored, and diced)
1 1/2 cups water
1/2 tsp. cinnamon (more if you like more)
1/8 tsp. nutmeg
2 Tbsp. brown sugar
1/4 cup sugar (or 3-4 packets artificial sweetener, if you'd prefer)
1 tsp. fresh lemon juice
lemon peel (2 swipes with peeler)

Instructions:
1. Combine all ingredients into a large pot.  Bring to a boil then reduce to medium and cover.
2. Let simmer at a low to medium heat for 40-45 minutes, stirring consistently.
3. When apples are soft, remove from heat and let cool for 5-10 minutes. Remove lemon peels.
4. For chunkier sauce, mash with a fork or potato masher. For smoother sauce, mash through fine metal strainer using a wooden spoon. 


final product!
The lemon juice and peel actually enhances the natural apple flavor so don't leave it out if you don't have to.

Serve warm or chilled, however you'd prefer.
Makes about 3 pints.

Pumpkin Bread...Skinny Style!

This may not quite compare to your favorite coffee shop's pumpkin bread but I've skipped the glaze and a whole lot of sugar so you conscious eaters aren't deprived of this fall favorite! In fact, this turned out so good and so moist that I have no reason to ever combine a different set of ingredients for pumpkin bread!


Ingredients:
1 cup light brown sugar
2 egg whites
1 cup pure pumpkin
1/4 cup canola oil
1/3 cup fat free plain greek yogurt
1 tsp. vanilla extract
1 cup all-purpose flour
3/4 cup whole wheat flour
1 1/2 tsp. baking powder
1 tsp. cinnamon
1/2 tsp. nutmeg
1/2 tsp. baking soda
1/2 tsp. salt

Instructions:
1. Preheat oven to 350 degrees and spray 1 loaf pan with nonstick cooking spray.
2. In large bowl, combine brown sugar and egg whites. Beat with wire wisk.
3. Add pumpkin, oil, yogurt and vanilla. Beat with electric mixer until completely combined.
4. In a separate bowl stir together flour, baking powder, cinnamon, nutmeg, baking soda and salt.
5.  Add dry ingredients to wet ingredients and stir until mixture is completely moistened, being careful to not over mix.
6. Pour batter into loaf pan and bake 45-50 minutes. Cool in pan for 10 minutes then transfer loaf to a wire rack to cool. 

Makes 1 loaf. Can be doubled.

Serving Suggestions:
Sprinkle with a tablespoon of brown sugar before baking for an added appeal.

Also, I always try to use fresh, real food so if you can get your hands on a pie pumpkin and make the puree in place of canned pumpkin, that'd be ideal! If you've never done that before, it's quite simple and a quick google search will yield plenty of how-to's.

Since this bread is so moist and contains yogurt, I'd store the loaf in a zip lock bag in the refrigerator to enhance shelf life and prevent molding. 

Tuesday, September 25, 2012

Ground Turkey Chili

 Whether it's a chilly fall evening or game day, a big bowl of chili always hits the spot. Using ground turkey and flavor packed spices will reduced the fat content and increase the comfort of this crave-able dish. And the best part, whether you think so or not, I'm willing to bet most of you already have every one of these spices in your spice cabinet!

Ingredients:
1 tsp. olive oil
1.25 lbs. lean ground turkey (93/7 fat content)
2 Tbsp. onion (finely chopped)
1 Tbsp. garlic (minced)
1 medium green pepper
2 cups water
1 1/2 cups tomatoes (diced)
2 Tbsp. ketchup
2 Tbsp. chili powder
1/2 tsp. paprika
1/2 tsp. dried oregano
1/4 tsp. cayenne pepper (increase to 1/2 tsp. if you like spicy!)
1/2 tsp. cumin
1/2 tsp. salt
1/2 tsp. black pepper
1 can (16 oz.) pinto beans (drained and rinsed)
1 can (16 oz.) kidney beans (drained and rinsed)

Instructions:
1. Heat olive oil in a large pot over medium heat. Add ground turkey and cook until browned.
2. Drain and rinse turkey. Return turkey to pot and add onion, garlic green pepper and water.  Simmer over medium heat for 10 minutes.
3. Add tomatoes, ketchup, chili powder, paprika, oregano, cayenne pepper, cumin, salt and pepper. Bring to a boil.
4. Reduce to low heat, cover and simmer for 20 minutes.
5. Add beans and simmer for an additional 10 minutes.

Serving suggestions:
Garnish with dried parsley flakes and enjoy with a couple crackers. Skip the sour cream and cheese...this chili can stand alone!

Great leftover and freezes well.

Sunday, September 23, 2012

Spaghetti Squash Pasta

Here's an easy, guilt free way to indulge in pasta. Super easy and versatile (not to mention DELICIOUS) Other than being lighter in texture, I don't know if I could really even tell a difference from regular pasta noodles. So head to your local farmer's market and pick up a spaghetti squash or two! 
Instructions:
1. Preheat oven to 350 degrees.
2. Cut spaghetti squash in half lengthwise and remove the seeds.
3. Spray a baking sheet with nonstick cooking spray and place each half face down.
4. Bake squash for 30 minutes.
5. Remove from oven and let cool until handle-able (about 15-20 minutes).
6. Take spoon and scrape the stringy insides of the squash into a bowl. Add your favorite pasta sauce, cheese, etc.
Serving suggestions: I melted shredded cheese on top, added homemade marinara pasta sauce (could use pre-made purchased pasta sauce too!), and served it with baked chicken breast. An awesome health conscious meal that I'll be making again VERY soon.

Wednesday, September 19, 2012

Chocolate Chip Banana Bread

Fall's here which means the oven is back in commission. Put those flavor packed brown bananas sitting on the counter to use and try out this super simple moist banana bread recipe (adding the chocolate chips is your call).  Looks good, doesn't it?! I have a feeling this loaf won't last long!


Ingredients:
1/2 cup butter (softened)
3/4 cup sugar
2 ripe bananas
1 tsp. vanilla extract
2 eggs
1 cup whole wheat flour
1 cup all-purpose flour
1 tsp. baking soda
1/4 cup chocolate chips (optional)

Instructions:
1. Preheat oven to 350 degrees and spray 1 9''x5'' bread pan with non-stick cooking spray. Set aside.
2. Cream butter and sugar together in large mixing bowl. Add bananas and vanilla extract.
3. Add two eggs, flour and baking soda and mix until completely moist.
4. Stir in chocolate chips and scrap mixture into pan.
5. Bake at 350 degrees for 55-65 minutes. Remove from oven and let cool in bread pan for 10-15 minutes.   

Makes 1 loaf. Can definitely be doubled to yield 2 loaves.

Serving suggestions: Try substituting the chocolate chips with walnut pieces.

Feel free to mess around with the wheat to all-purpose flour ratio for extra fiber.  However, keep in mind the gluten content of whole wheat flour is lower and you may end up with a loaf of banana bread significantly lacking structure. I typically stay on the safe side.     

Friday, August 31, 2012

Egg White Pita Scrambler!

...and no, that's not chicken.

Ingredients:
1 Joseph's Pita
3 Egg Whites (or 2 whole eggs, if you prefer)
Cayenne Pepper
Salt and Pepper

Instructions:
1. Spray cooking pan with non-stick cooking spray.
2. Place egg whites in pan and scramble. Sprinkle with cayenne pepper, salt, and pepper.
3. While the eggs are cooking, place pita in toaster for 30-45 seconds or until hot to touch.
4. Cut pita in half. When eggs are done, stuff scrambled eggs into each half of the pita and serve immediately.

Serving suggestions: If you don't enjoy a little spice, omit the cayenne pepper.  You could also add a small amount of diced deli ham and cheese and/or some diced peppers and onions!

A beyond easy breakfast that's quick, delicious, and nutritious. Using this particular pita bread instead of regular bread drastically reduces the amount of carbohydrates and fat (and subsequently calories) to this meal.  They're also loaded with heart healthy ingredients and are a great fix for the starchy/carb cravings that often accompany weight loss. You likely either love, can't find, or haven't heard of them. They're usually found in the deli section of grocery stores.  At a delicious 50 Calories per pita, I'd say it's a must try. Check out their entire bakery line up at http://www.josephsbakery.com/


Wednesday, August 29, 2012

Gazpacho Recipe

A few summers ago I got adventurous and spent a few months as an Au Pair in Spain.  A not so pleasant experience as a whole, but there was one positive outcome...my discovery of GAZPACHO! For those unfamiliar, gazpacho is a tomato based soup served cold. Rarely seeing it pre-made in stores and having many of the ingredients fresh from my garden, I decided to give it a whirl. Not surprising, it turned out AMAZING! Broaden your food horizons and be open minded about giving this one a try. You won't be disappointed.


Ingredients
3 Cups Tomato Juice
1/4 Cup Onion (minced)
1 Green Pepper (diced)
1 Cucumber (seeded and peeled)
2 Cups Tomato (chopped)
2 Green Onions (minced)
1 Clove Garlic
3 Tbsp. Fresh Lemon Juice
2 Tbsp. Red Wine Vinegar
1 tsp. Basil (dried)
1/4 Cup Fresh Parsley (chopped)
1 tsp. Sugar (I used 1 pack of Truvia instead)
Salt and Pepper to taste

Instructions
1. Combine all ingredients into blender or food processor.
2. Pulse until mixture becomes completely smooth like a purée.
3. Refrigerate for 2 hours.
4. Serve in soup or coffee mug. Garnish with a lemon wheel and add a couple ice cubes, if desired.

Serves 8-10.


Friday, August 24, 2012

Homemade Chicken and Veggie Spring Rolls Recipe

An all time favorite meal of mine. My boyfriend actually deserves (most of) the credit for this one. Works best if you have a partner to tackle these so one can attend to the rice papers and the other can assemble and roll. 


Ingredients:
2 Cups Broccoli Slaw
1 Cup Matchstick Carrots
2 Cups Chicken (shredded)
2 Medium Red Peppers (thinly julienned)
12-15 Rice Papers (Asian section at grocery store)

Instructions:
1. Fill a bowl (large enough for the rice papers to lay flat in) with lukewarm water. Place 1 rice paper into water for 30-45 seconds or until rice paper becomes slightly sticky.
2. Pull rice paper from water and carefully lay flat onto a paper towel. Flip rice paper onto a cutting board and peel paper towel from rice paper. 
3. Towards the top, assemble a small amount of each ingredient into an approx. 1 inch wide strip across the rice paper.
4. Fold in the sides and top then gently (but tightly) roll the rice paper around the chicken and vegetables.
5. Serve immediately or place in refrigerator for a few hours to reduce sticky-ness of spring roll exterior.

Leftover spring rolls can be stored in the refrigerator for up to 3 days (mmm...lunch break?!) so go ahead and make some extras. 

Serving suggestions: I cut them into cute sushi-like pieces, my boyfriend likes them cut once right down the center, either way, enjoy plain or dipped in sweet chili and/or Thai peanut sauce.

Don't let the rice papers intimidate you. They sound (and have a reputation) for being a pain but after 1 or 2 tries, you'll quickly get the hang of it! 

Thursday, August 23, 2012

Greek Yogurt Tzatziki Recipe

Have some extra cucumbers you're not sure what to do with? Here's an awesome (and refreshing) greek yogurt tzatziki recipe. Great for your next end of summer gathering or to snack on at home.

Ingredients:
1 Medium Sized Cucumber
1 Tbsp. Dill
1 Clove Garlic
1 Tbsp. Olive Oil
1 tsp. White Vinegar
2 Cups Plain Greek Yogurt
Salt and Pepper

Instructions:
1. Grate cucumber onto paper towel and squeeze to remove water.
2. Place in medium container with lid. 
3. Add dill, garlic, olive oil, white vinegar, and greek yogurt. Stir.
4. Season to taste with salt and pepper.
5. Serve immediately or refrigerate 2-3 hours for extra flavor!

Serving Suggestions: a great dip to pair with crackers, pita chips, or fresh bread.